Web Services (SOAP/XML)
Web services can't be recorded with a browser because there's no UI to click through. Instead, you create test cases by importing raw HTTP request and response files, then configure Load Tester to track sessions and validate responses just like browser-based tests.
This guide shows you how to:
- Create a web service test case from scratch (no browser recording)
- Configure session tracking using extractors and modifiers
- Use datasets for multiple users
- Validate XML/SOAP response content
- Run load tests against web services
Browser-based applications send requests through a UI you can click. Web services send XML or SOAP payloads directly, with no browser involved. Load Tester handles both, but web service testing requires manually creating the HTTP transactions instead of recording them.
Prerequisites
Before testing a web service, you need:
- Sample request and response files - HTTP requests (headers + XML/SOAP body) and server responses
- Session tracking knowledge - How your service tracks sessions (session IDs, tokens, cookies)
- Authentication requirements - Credentials, tokens, or certificates the service requires
- Validation requirements - What response values indicate success vs. failure
Where to get sample request/response files:
- Developer documentation - API docs often include sample requests/responses
- Network trace - Capture live traffic using Wireshark, Fiddler, or browser DevTools
- Developer handoff - Ask the development team for working examples
Example Web Service
This guide uses a banking web service with two operations:
| Operation | Purpose | Request Parameters | Response Fields |
|---|---|---|---|
| login | Authenticate user | username, password | sessionId, status |
| get-balance | Retrieve account balance | sessionId (from login) | balance, status |
Session tracking: The login operation returns a sessionId that must be included in all subsequent requests (like get-balance). This is typical web service behavior, and it's the part that requires configuration: Load Tester extracts the session ID from the login response and inserts it into later requests automatically.
Example login request:
POST /demo/bank HTTP/1.1
Host: www.example.com
Content-Type: text/xml
Content-Length: 111

<request>
  <operation>login</operation>
  <username>JAMES</username>
  <password>nkbmmfn</password>
</request>
Example login response:
HTTP/1.1 200 OK
Content-Type: text/xml

<response>
  <operation>login</operation>
  <sessionId>ABC123XYZ</sessionId>
  <status>success</status>
</response>
Example get-balance request (must include sessionId from login):
POST /demo/bank HTTP/1.1
Host: www.example.com
Content-Type: text/xml
Content-Length: 89

<request>
  <operation>get-balance</operation>
  <sessionId>ABC123XYZ</sessionId>
</request>
Example get-balance response:
HTTP/1.1 200 OK
Content-Type: text/xml

<response>
  <operation>get-balance</operation>
  <balance>1000.00</balance>
  <status>success</status>
</response>
Step 1: Create an Empty Test Case and Import the Login Request
Unlike browser testing, you don't record a web service. You start with an empty test case and import each operation from request and response files.
Create an Empty Test Case
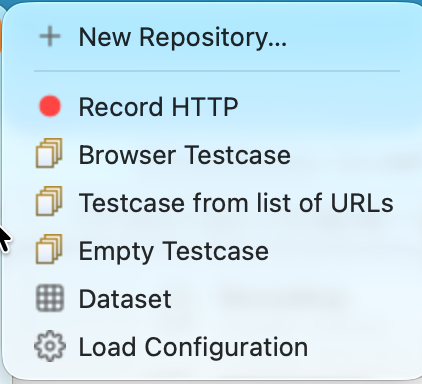
- File → New → Empty Testcase
- Name the test case (e.g.,
BankServiceDemo) and pick the repository to save it in - Click Finish
Load Tester opens the new (empty) test case in the Test Case Editor.
Import the Login Request and Response
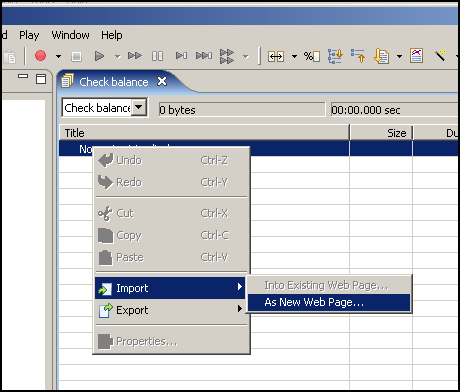
The same Import → As New Web Page... action you'll use later in Step 2 also creates the very first page of an empty test case.
- In the Test Case Editor, right-click the empty page area → Import → As New Web Page...
- Browse to the login request file (e.g.,
login-request.txt) when prompted, then to the matching response file - Name the transaction:
Login - Click Finish
What Load Tester does: Parses the HTTP headers and XML body from the request file and pairs them with the response file. Files must contain the complete HTTP request and response in the same format you'd send and receive over the wire.
Result: The test case now has one page containing one transaction (the login request/response pair). The transaction appears in the Test Case Editor tree.
Step 2: Add Additional Operations (Get-Balance)
Web services typically have multiple operations. One test case can include login, data retrieval, updates, and logout. Add each operation as a separate transaction.
Add the Get-Balance Transaction
- Right-click the page in Test Case Editor → Import → As New Web Page...
- Browse to the get-balance request file (same wizard as Step 1)
- Browse to the get-balance response file
- Name the transaction:
Get Balance - Click Finish
Result: The test case now has two transactions: Login → Get Balance. This simulates a user logging in and checking their account balance.
(To add a transaction inside an existing page rather than as a new page, choose Import → Into Existing Web Page... instead.)
Step 3: Configure Session Tracking (Extractor + Modifier)
Here's the problem: the login response contains a session ID (ABC123XYZ) that the get-balance request must include. But session IDs change on every login, so you can't hard-code a session ID from the sample response.
Solution: Use an extractor to capture the session ID from the login response, then use a modifier to insert it into the get-balance request.
Extract the Session ID from Login Response
- Click the Login transaction in Test Case Editor
- Open Extractors View: Window → Show View → Extractors
- In Extractors View, click Add (➕ icon)
- Extractor type: Boundary Extractor (recommended for XML)
- Configure the extractor:
| Field | Value | Why |
|---|---|---|
| Name | sessionId |
Variable name to store the extracted value |
| Left boundary | <sessionId> |
Text immediately before the value to extract |
| Right boundary | </sessionId> |
Text immediately after the value |
| Occurrence | 1 (first match) |
Extract the first occurrence |
- Click OK
What this does: When the login response comes back with <sessionId>ABC123XYZ</sessionId>, Load Tester extracts ABC123XYZ and stores it in the variable {sessionId}. This variable is available to all subsequent transactions.
Insert the Session ID into Get-Balance Request
- Click the Get-Balance transaction in Test Case Editor
- Open Field Modifiers View: Window → Show View → Field Modifiers (or Actors View → Fields tab)
- Find the sessionId field in the request body (the value you need to replace)
- Right-click the field → Configure Field
- Field type: Variable Substitution
- Variable name:
{sessionId}(use curly braces) - Click OK
What this does: Load Tester replaces the hard-coded session ID in the get-balance request with the value extracted from the login response. Now the test case works regardless of what session ID the server assigns.
Before modifier:
After modifier:
Step 4: Test with Replay
Verify session tracking works before adding datasets or running load tests.
- Click Play (▶️) to replay the test case
- Watch Replay View: Both transactions should succeed (green)
- Verify session tracking:
- Click Login transaction → Open Content View → See the sessionId in the response
- Click Get-Balance transaction → Open Headers View → Request Headers → Verify sessionId was inserted correctly
If get-balance fails with authentication error:
- ❌ Extractor boundaries are wrong (session ID wasn't captured)
- ❌ Modifier variable name is wrong (typo in
{sessionId}) - ❌ Session ID location in request is wrong (should be in body, not headers)
Fix: Re-run ASM by right-clicking the test case → Configure → Application State... (or run the full Configure for Replay wizard if hostnames haven't been restricted yet). Load Tester will auto-detect the session ID and configure extractors/modifiers for you.
Step 5: Configure Datasets for Multiple Users
Real load tests use different credentials for each virtual user. Testing with one hard-coded username isn't realistic, and it won't reveal concurrency issues. Use datasets to provide different usernames and passwords for each virtual user.
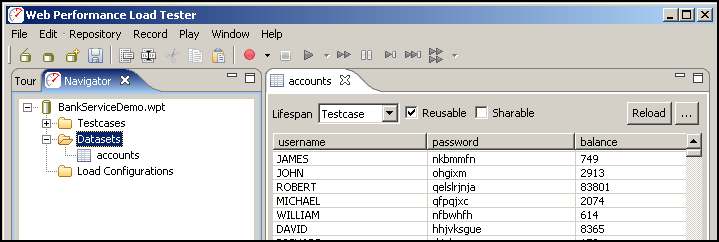
Create a Dataset
- File → New → Dataset
- Name:
accounts - Add columns:
username,password,balance - Add rows with different user credentials and the expected account balance each should see:
| username | password | balance |
|---|---|---|
| JAMES | nkbmmfn | 749 |
| JOHN | ohjqxm | 2913 |
| ROBERT | qelslrjnja | 83801 |
| MICHAEL | qfpqjxc | 2074 |
| WILLIAM | nfbwhfh | 614 |
| DAVID | hhjvksgue | 8365 |
- Save the dataset
Link Dataset to Login Request
- Click the Login transaction in Test Case Editor
- Open Field Modifiers View (if not already open)
- Find the username field in the request body
- Right-click username → Configure Field
- Field type: Dataset Column
- Dataset:
accounts - Column:
username - Click OK
- Repeat for password field: Map to
accounts.password
What this does: Each virtual user picks a different row from the dataset. Virtual user 1 uses JAMES/nkbmmfn, virtual user 2 uses JOHN/ohjqxm, etc.
Step 6: Add Content Validation
Don't assume a 200 OK means success. Web services routinely return 200 OK with an error status buried inside the XML body. Validate the actual response content.
Validate the Balance
- Click the Get-Balance transaction in Test Case Editor
- Open Validators View: Window → Show View → Validators
- Click Add (➕ icon)
- Validator type: Content Validation
- In the Create Content Validator dialog, configure these fields:
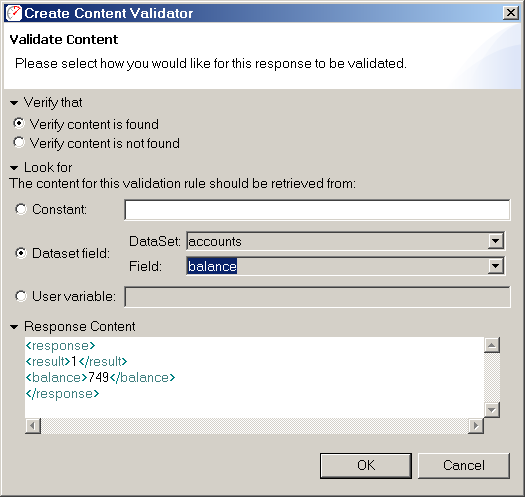
| Section | Setting | Value |
|---|---|---|
| Verify that | Choose the radio button | Verify content is found |
| Look for | Choose the source | Dataset field |
| Look for → Dataset field | DataSet dropdown | accounts |
| Look for → Dataset field | Field dropdown | balance |
- Click OK
What this does: Load Tester checks whether the response body contains the current value of the balance column from the accounts dataset row this virtual user picked. If the balance is wrong (or missing), the transaction fails, even if the HTTP status is 200 OK.
Example: Virtual user 1 logs in as JAMES (balance row 749). If the server's response contains <balance>749</balance>, the validator passes. If it returns <balance>500</balance> instead, the validator fails and the transaction turns red.
Validate Success Status
- Add another validator (repeat steps above)
- Content to find:
<status>success</status> - Validation mode: Must contain
- Click OK
Many web services return 200 OK even when the operation fails, tucking <status>error</status> into the XML. Checking for <status>success</status> ensures the operation actually succeeded.
Step 7: Run a Load Test
Now that the test case works (session tracking configured, datasets linked, validators in place), you can run a load test.
- Configure load test: See Configuring a Load Test
- Configure virtual users: Set user count (e.g., 100 virtual users)
- Dataset behavior: Enable "Reuse dataset rows" if you have fewer rows than virtual users (virtual users will share credentials)
- Run the load test: Click Run (▶️ in Load Test Config)
What happens:
- Virtual user 1 logs in as
JAMES, extracts session ID, gets balance, validates it's1000.00 - Virtual user 2 logs in as
MARY, extracts session ID, gets balance, validates it's2500.50 - Virtual user 3 logs in as
JOHN, extracts session ID, gets balance, validates it's500.00 - Virtual user 4 reuses row 1 (JAMES) if "Reuse dataset rows" is enabled
See: Datasets & Data-Driven Testing for dataset row assignment behavior.
Troubleshooting Web Service Tests
Problem: Session ID Not Extracted
Symptom: Get-balance fails with authentication error (401/403), or response says "invalid session ID"
Cause: Extractor boundaries are wrong, so the session ID wasn't captured from the login response
Fix:
- Click Login transaction → View response in Content View
- Find the session ID in the response (exact XML tag names)
- Update extractor boundaries to match exact tag names (case-sensitive)
- Run replay again and verify session ID is extracted (check Variables tab in Replay View)
Common mistakes:
- ❌ Left boundary is
<sessionid>but response has<sessionId>(case mismatch) - ❌ Right boundary includes extra whitespace or newlines
- ❌ Session ID is in an attribute (
<session id="ABC123"/>) instead of tag content. Use Regex Extractor instead of Boundary Extractor
Problem: Dataset Values Not Being Used
Symptom: All virtual users use the same username (always JAMES, never MARY or JOHN)
Cause: Field modifiers aren't configured to pull values from the dataset
Fix:
- Open Field Modifiers View (or Actors View → Fields tab)
- Verify username and password fields are mapped to dataset columns
- If not mapped: Right-click each field → Configure Field → Dataset Column → Select
accountsand appropriate column - Run replay again and verify different usernames are used (check Request Headers in Headers View)
See: Datasets & Data-Driven Testing for complete dataset configuration.
Problem: Validation Fails Even Though Response Looks Correct
Symptom: Validator fails, but when you manually inspect the response in Content View, the expected value is there
Cause: Whitespace, formatting, or encoding differences between expected and actual values
Fix:
- Check for whitespace: Response might have
<balance> 1000.00 </balance>(extra spaces) but validator expects1000.00(no spaces) - Use Contains instead of Exact Match: Change validator mode from "Exact Match" to "Must contain" (more forgiving)
- Normalize whitespace: If the service always includes extra spaces, update the dataset to match the actual response format
Problem: SOAP Envelope Required
Symptom: Server rejects the request with "invalid XML" or "SOAP envelope missing"
Cause: Some SOAP services require a full SOAP envelope (not just the XML payload)
Fix: Wrap your XML payload in a SOAP envelope:
<?xml version="1.0" encoding="UTF-8"?>
<soap:Envelope xmlns:soap="http://schemas.xmlsoap.org/soap/envelope/">
  <soap:Body>
    <request>
      <operation>login</operation>
      <username>JAMES</username>
      <password>nkbmmfn</password>
    </request>
  </soap:Body>
</soap:Envelope>
Update the request file with the SOAP envelope, then re-import the transaction.
Advanced Configuration
Extracting Multiple Values
If your service returns multiple fields (user ID, session token, expiration time), extract all of them:
- Add multiple extractors to the login transaction (one per field)
- Use unique variable names for each:
{sessionId},{userId},{expirationTime} - Insert them into subsequent requests using modifiers
Example: Get-balance request might need both session ID and user ID:
<request>
  <operation>get-balance</operation>
  <sessionId>{sessionId}</sessionId>
  <userId>{userId}</userId>
</request>
Chaining Multiple Operations
Real-world test cases often include 5-10 operations (login → get-balance → transfer-funds → logout). Add each operation as a separate transaction and chain them:
- Login - Extract session ID
- Get-balance - Use session ID, extract current balance
- Transfer-funds - Use session ID, transfer amount, extract new balance
- Get-balance (again) - Use session ID, validate new balance matches expectation
- Logout - Use session ID
Each operation uses values extracted from previous operations, building a chain of dependencies that mirrors how real users interact with the service.
Testing REST APIs vs. SOAP
This guide uses SOAP/XML, but the same principles apply to REST APIs:
- REST APIs typically use JSON instead of XML (same extractor/modifier approach works)
- Authentication often uses OAuth Bearer tokens instead of session IDs (see OAuth & Bearer Tokens)
- HTTP methods vary (GET, POST, PUT, DELETE) but Load Tester handles all methods
See: REST/API Testing for REST-specific guidance.
Ask the AI to Configure Web Service Tests
If you're stuck configuring session tracking or validators:
I have a SOAP web service with a login operation that returns a session ID.
Can you help me configure the extractor to capture the session ID and insert
it into subsequent requests?
The AI can:
- Analyze your request/response files to identify session tracking fields
- Configure extractors with correct boundaries (accounting for XML formatting)
- Set up modifiers to insert extracted values into subsequent requests
- Create validators to check for success/error status codes
- Debug why session tracking isn't working (common mistakes)
- Recommend dataset structures for your specific service
Next Steps
After testing web services:
- Run load tests: See Configuring a Load Test
- Monitor server performance: See Server Monitoring
- Analyze results: See Analyzing Results
For other platforms:
- REST APIs: REST/API Testing
- Salesforce: Salesforce Testing
For configuration topics:
- Session tracking: Application State Management
- Datasets: Datasets & Data-Driven Testing
- Authentication: OAuth & Bearer Tokens