Import/Export
Sometimes you need to work with HTTP transactions outside the normal recording workflow: importing requests captured by other tools, or exporting test case data for analysis or sharing. Load Tester's import/export features let you move HTTP transaction data in and out of test cases.
This guide covers when to use import/export, how to prepare the files, and step-by-step procedures for both operations.
When to Import Transactions
Import transactions when normal browser recording isn't possible or practical:
| Use Case | Why Import? |
|---|---|
| Web service/API testing | Client doesn't support proxy configuration (can't record normally) |
| Mobile app testing | App's HTTP client bypasses system proxy settings |
| Protocol-level testing | Need exact control over headers, body, or HTTP version |
| Reproducing production issues | Captured traffic from production using network tools (tcpdump, Wireshark) |
| Sharing test cases | Colleague sends you raw HTTP transactions to import |
Recording is almost always easier for browser-based applications. Import is the fallback for when recording isn't an option.
Exporting Transactions
Export transactions when you need to:
| Use Case | Why Export? |
|---|---|
| Debugging correlation | Examine raw HTTP to understand dynamic values |
| Sharing with support | Send exact request/response to troubleshoot issues |
| External analysis | Use diff tools to compare requests across replays |
| Documentation | Include sample HTTP transactions in technical docs |
| API testing tools | Move transactions to Postman, curl, or other tools |
Importing Transactions
Prerequisites
Before importing, you need HTTP request and response files in raw format:
Request file (request.txt):
GET /api/users/123 HTTP/1.1
Host: example.com
User-Agent: MyApp/1.0
Authorization: Bearer abc123token
Accept: application/json
Response file (response.txt):
HTTP/1.1 200 OK
Content-Type: application/json
Content-Length: 85

{"id":123,"name":"John Doe","email":"john@example.com"}
Format requirements: - Plain text files (not HAR, PCAP, or other binary formats) - Raw HTTP messages (exactly as sent on the wire) - No extra formatting, headers, or metadata
Capturing HTTP for Import
Use these tools to capture raw HTTP transactions:
Option 1: Browser DevTools (for APIs)
- Open Chrome DevTools → Network tab
- Right-click request → Copy → Copy as cURL (bash)
- Convert cURL to raw HTTP using online tools or manually
Option 2: Network Diagnostic Tools
- Wireshark - Capture traffic, export as "Follow TCP Stream"
- tcpdump - Capture with
tcpdump -A port 80 - mitmproxy - Proxy tool that exports raw HTTP
Option 3: API Testing Tools
- Postman - Export requests as raw HTTP
- curl - Use
-vflag to see raw request/response
Import Procedure
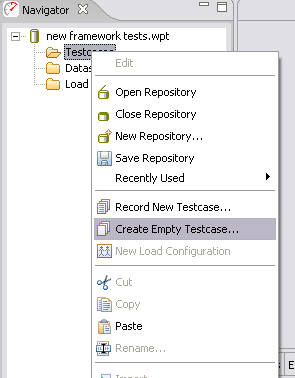
Step 1: Create or Open Test Case
For new test case:
- Right-click on Test Cases node in Navigator View
- Select: Create Empty Test Case
- Name your test case and click OK
For existing test case:
- Double-click test case in Navigator View to open Test Case Editor
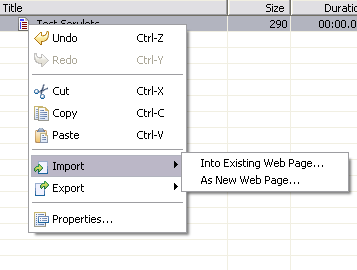
Step 2: Import Transaction
To add to existing web page:
- Right-click on the web page in Test Case Editor
- Select: Import → Into Existing Web Page
- Browse to select request file
- Browse to select response file
- Click: OK
To create new web page:
- Right-click anywhere in Test Case Editor (not on existing page)
- Select: Import → As New Web Page
- Browse to select request file
- Browse to select response file
- Click: OK
The transaction appears in the Test Case Editor with the imported request/response data.
Step 3: Verify Import
After importing:
- Click the imported transaction in Test Case Editor
- Check Request View - Verify URL, headers, body are correct
- Check Content View - Verify response body loaded correctly
- Run replay - Ensure transaction works in replay
Post-Import Configuration
Imported transactions usually need configuration:
| Configuration | Why Needed |
|---|---|
| ASM correlation | Dynamic values need to be correlated (session IDs, tokens) |
| Field configuration | Mark fields that should be unique per user |
| Authentication | Configure auth headers if they'll change |
| Validation rules | Add checks to verify responses |
Imported transactions won't have automatic correlation, so you'll need to configure ASM manually.
Exporting Transactions
Export lets you save raw HTTP request or response data from any transaction in a test case.
Export Procedure
Step 1: Open Test Case
- Double-click test case in Navigator View to open Test Case Editor
- Select the transaction you want to export
Step 2: Export Request or Response
- Right-click on the transaction
- Select: Export
- Choose what to export:
- Request - HTTP request (URL, headers, body sent to server)
- Response - HTTP response (headers, body received from server)
- Browse to select save location
- Name the file (e.g.,
request.txt,response.json) - Click: OK

The complete HTTP message is saved to the selected file.
What Gets Exported
Request export includes:
POST /api/login HTTP/1.1
Host: example.com
Content-Type: application/json
Content-Length: 45

{"username":"testuser","password":"secret123"}
Response export includes:
HTTP/1.1 200 OK
Content-Type: application/json
Set-Cookie: session=abc123; Path=/

{"token":"xyz789","expires":"2026-02-12T10:00:00Z"}
Exported data is exactly what was sent or received: no formatting, no interpretation, just raw HTTP.
Common Use Cases
Use Case 1: API Testing (Import)
Scenario: Testing a REST API where the client app doesn't support proxy configuration.
Solution:
- Use Postman or curl to create API request
- Export as raw HTTP request/response
- Import into Load Tester
- Configure authentication and parameterization
- Add to load profile
Use Case 2: Debugging Correlation (Export)
Scenario: Test case replay fails with "session expired" error. Need to see raw HTTP to find session token.
Solution:
- Export request from failing replay
- Search exported file for session identifiers
- Use ASM to correlate the dynamic value
- Re-run replay to verify fix
Use Case 3: Sharing Test Cases (Import + Export)
Scenario: Colleague needs to test same API endpoints you're using.
Solution:
- Export requests from your test case
- Send exported files to colleague
- Colleague imports into new test case
- Both test cases now use identical HTTP transactions
Troubleshooting
Import Fails: "Invalid HTTP Message"
Symptom: Import dialog shows error about invalid format.
Possible causes: 1. File isn't raw HTTP - Contains HAR, JSON, or other wrapper format 2. Extra whitespace or headers - File includes comments or metadata 3. Incorrect line endings - Windows CRLF vs Unix LF mismatch
Solution:
- Verify file contains ONLY raw HTTP (start with GET or HTTP/1.1)
- Remove any extra content before/after HTTP message
- Convert to Unix line endings if needed
Imported Transaction Won't Replay
Symptom: Imported transaction shows errors during replay.
Likely causes: 1. Missing correlation - Dynamic values (session IDs, tokens) not correlated 2. Hardcoded data - Request contains user-specific data that needs parameterization 3. Authentication expired - Imported auth token no longer valid
Solution: - Run the Configure for Replay wizard to detect and correlate dynamic values - Replace hardcoded data with fields or datasets - Update authentication to use valid credentials
Exported File Too Large
Symptom: Exported response file is hundreds of megabytes.
Cause: Response includes large binary content (images, videos, file downloads).
Solution: - This is expected; exported files include complete response body - If you only need headers, manually edit exported file to remove body - Use external tools (less, head, tail) to view large files without opening in editor
Can't Find Import Menu Option
Symptom: Right-click on transaction doesn't show Import option.
Cause: Import is only available in Test Case Editor, not other views.
Solution: 1. Double-click test case in Navigator View to open Test Case Editor 2. Right-click in Test Case Editor (not in Navigator View or other views) 3. Import option appears in context menu
Best Practices
1. Test Imports Immediately
After importing transactions: - ✅ Run replay to verify transaction works - ✅ Check ASM for required correlation - ✅ Validate response content is correct
Don't assume imports work just because they loaded without errors. Always verify with a replay before adding to load tests.
2. Preserve Original Files
When importing: - ✅ Keep original request/response files - ✅ Document where files came from (tool, date, environment) - ✅ Store with test case documentation
This makes it easier to debug issues or re-import if needed.
3. Export for Documentation
Before making significant changes to test cases: - ✅ Export key transactions for reference - ✅ Include exports in technical documentation - ✅ Use exports to communicate with developers about expected API behavior
Raw HTTP is often clearer than screenshots or prose descriptions when communicating with developers.
4. Prefer Recording When Possible
Import is a workaround, not the primary workflow. Browser recording captures everything automatically (correlation, cookies, redirects), while import requires manual configuration for all of that. Recording is faster and less error-prone. Use import only when recording isn't technically feasible.
Related Topics
- Recording Test Cases - Primary method for creating test cases
- ASM Correlation - Correlating dynamic values in imported transactions
- Authentication - Configuring auth for imported API requests
- REST/API Testing - Complete guide to API testing workflows
- Getting Support - Contact support for import/export issues
Quick Reference
Import Transaction: 1. Right-click in Test Case Editor 2. Import → As New Web Page (or Into Existing Web Page) 3. Select request file and response file 4. Run replay to verify
Export Transaction: 1. Select transaction in Test Case Editor 2. Right-click → Export 3. Choose request or response 4. Save to file
File Format: Plain text, raw HTTP messages only (no HAR, PCAP, JSON wrappers)