OAuth & Bearer Tokens
There has always been a race between hackers and web security experts, and performance testing professionals are caught in the crossfire: the same techniques hackers use are the ones we need for configuring test scripts. OAuth 2.0 is the de-facto authentication standard these days, and v7.0 now includes automatic OAuth detection that handles most implementations without manual configuration.
This guide covers Load Tester's OAuth automation capabilities first, then manual configuration for the rare cases where automation needs help.
How OAuth Automation Works (v7.0)
The easiest way to configure OAuth is to let ASM do it. When you record an OAuth authentication flow and run ASM, Load Tester's built-in OAuth detection rules analyze your test case and automatically:
- Detect OAuth tokens in JSON, XML, or header responses
- Extract tokens into user variables (e.g.,
bearer_token[1]) - Correlate Authorization headers with extracted tokens
- Inject tokens into subsequent requests automatically
You don't need to create extractors or configure fields manually - ASM handles it all.
What You'll See After ASM
When ASM successfully detects OAuth:
- Authorization headers show "Server authentication header" as the datasource
- This is NORMAL - it means the authentication framework is controlling the header
- Token variables appear in the Fields View (like
bearer_token[1]) - Replay succeeds with all green transactions
OAuth Detection Rules
Load Tester includes 14 specialized OAuth detection rules that handle various token formats:
| Detection Rule | What It Detects |
|---|---|
| oauth2-access-token | Standard access_token in JSON responses |
| oauth2-refresh-token | Refresh tokens for token renewal |
| oauth2-jwt-token | JWT (JSON Web Token) format with validation |
| oauth2-bearer-header | Tokens returned in response headers |
| oauth2-token-expires | Token expiration time (expires_in field) |
| oauth2-token-type | Token type validation (Bearer) |
| oauth2-xml-token | XML/SOAP response token extraction |
| oauth2-token-endpoint | Token endpoint URL for refresh requests |
| oauth2-rotating-refresh-token | New refresh tokens during refresh flow |
| oauth2-client-credentials | Client credentials grant flow |
| oauth2-grant-type-refresh | Refresh grant type detection |
| oauth2-error-detection | OAuth error responses triggering refresh |
| oauth2-custom-field | Non-standard token field names |
| oauth2-bearer-token-region | Regional token variations |
These rules work together to handle complex OAuth flows including token refresh, rotating refresh tokens, and multiple token types (access, refresh, ID tokens).
Ask the AI to Enable OAuth Rules
If ASM doesn't detect your OAuth implementation automatically, the AI can enable specific detection rules:
My application uses OAuth2 authentication with access tokens and refresh
tokens in JSON responses. Can you enable the appropriate OAuth detection
rules and re-run ASM?
The AI can: - List available OAuth detection rules - Enable specific rules for your application type - Enable all OAuth rules at once for comprehensive coverage - Re-run ASM after enabling rules
Workflow: Record → ASM → Replay
Standard OAuth workflow (works for 90% of applications):
- Record your authentication flow - Login through OAuth provider, get redirected back to your app
- Run ASM - ASM automatically applies OAuth detection rules
- Run a replay - Verify all transactions succeed (green in Replay View)
- Done! - OAuth is configured automatically
If replay succeeds, you're done. If replay fails, see Troubleshooting ASM Detection below.
Recognizing OAuth Authentication
You can usually tell if a website uses OAuth or Bearer tokens because the site throws 401 or 404 errors when you attempt a replay. Examining the headers will reveal an Authorization entry with a format like this:
The value may appear once or many times. Some sites set it once; others set it on different parts of the site. This dynamic token is issued by the authentication server during login and must be extracted from the response and injected into subsequent requests.
What is OAuth 2.0?
OAuth 2.0 is an authorization framework that allows applications to obtain limited access to user accounts on an HTTP service. The server issues a token (often a JWT - JSON Web Token) after successful authentication, which the client includes in subsequent requests to prove its identity.
Ask the AI
If you're seeing authentication errors and aren't sure if they're OAuth-related:
Troubleshooting ASM Detection
If ASM doesn't automatically detect your OAuth implementation, try these approaches:
1. Enable OAuth Detection Rules via AI
The AI can enable specific OAuth detection rules for your application:
Enable OAuth Rules
My OAuth tokens aren't being detected automatically. Can you enable
the OAuth detection rules and re-run ASM?
The AI will: 1. List available OAuth detection rules 2. Enable relevant rules based on your application type 3. Re-run ASM with the new rules active 4. Report what was detected
2. Check for "Server Authentication Header"
After ASM runs, check the Fields View for Authorization headers:
- ✅ GOOD: Datasource shows "Server authentication header"
- ❌ NEEDS WORK: Datasource shows "Recorded Value" or blank
"Server authentication header" is NORMAL - it means ASM successfully detected OAuth and the authentication framework is controlling token injection.
3. Verify Token Variables Were Created
Look in the Fields View for user variables like:
bearer_token[1]access_token[1]refresh_token[1]
If these variables exist, ASM extracted the tokens successfully.
4. When ASM Can't Detect Your OAuth Implementation
Some OAuth implementations use non-standard field names or formats that ASM's detection rules don't match. This is rare, but when it happens, you'll need manual configuration.
Signs you need manual configuration:
- ❌ Replay fails with 401/403 errors after running ASM
- ❌ No "Server authentication header" datasource appears
- ❌ No OAuth-related user variables created
- ❌ AI reports "No OAuth patterns detected"
If this happens, follow the manual configuration steps below.
Manual Configuration (When Automation Fails)
Manual Configuration is Last Resort
Only use manual configuration if ASM's automatic OAuth detection didn't work. Most OAuth implementations are detected automatically in v7.0.
The manual process involves three steps: finding the token, creating an extractor, and configuring headers.
Step 1: Find Where the Token is Set
Start by finding where the token value appears, using the Search Tab on the Response Content.
- Select your entire test case in the Navigator
- Open the Search tab (bottom of editor area)
- Search for "Authorization" or the token value itself
- Note which page/transaction contains the token in the response
The search results will show you exactly where the authentication server is setting the token - typically during or immediately after the login transaction.
Search Strategy
If you can't find the token by searching for "Authorization", try searching for "Bearer" or "token". OAuth tokens can be returned in JSON responses like:
Step 2: Create an Extractor for the Token
Once you've found where the token is set, you need to extract it into a user variable so each virtual user gets their own token.
To create the extractor:
- Navigate to the page/transaction where the token appears (e.g., Page 3, Transaction 4)
- Click the Actors tab at the top of the editor
- Click the Extractors tab at the bottom
- Click the green plus sign to create a new extractor
- Configure the extractor:
- Type: Regular Expression (or JSON Path if the token is in JSON)
- Pattern: Design a pattern to capture the token value
- Variable name: Choose a descriptive name like
access_tokenorBearerToken
Example Regular Expression Pattern
For a JSON response like {"access_token": "abc123xyz"}:
For an Authorization header like Authorization: Bearer abc123xyz:
The parentheses () capture the token value, which Load Tester stores in your chosen variable name.
Extractor Types
This example uses a regular expression, but you can also use:
- Boundary extraction - Extract text between left/right delimiters
- JSON Path - Extract from JSON using paths like
$.access_token - JavaScript - Write custom extraction logic for complex scenarios
Choose the simplest method that works for your application.
Verify the extraction:
- The parsed text should be underlined in blue in the response content view
- The Parsed Data field at the bottom of the extractor dialog shows the captured value
If you don't see the parsed data, your pattern doesn't match. Adjust the pattern and test again.
Ask the AI
If you're having trouble creating the right extractor:
Step 3: Configure Header Fields to Use the Token
Now that the token will be extracted into a user variable, you need to configure all the Authorization headers to use this dynamic value.
Header configuration workflow:
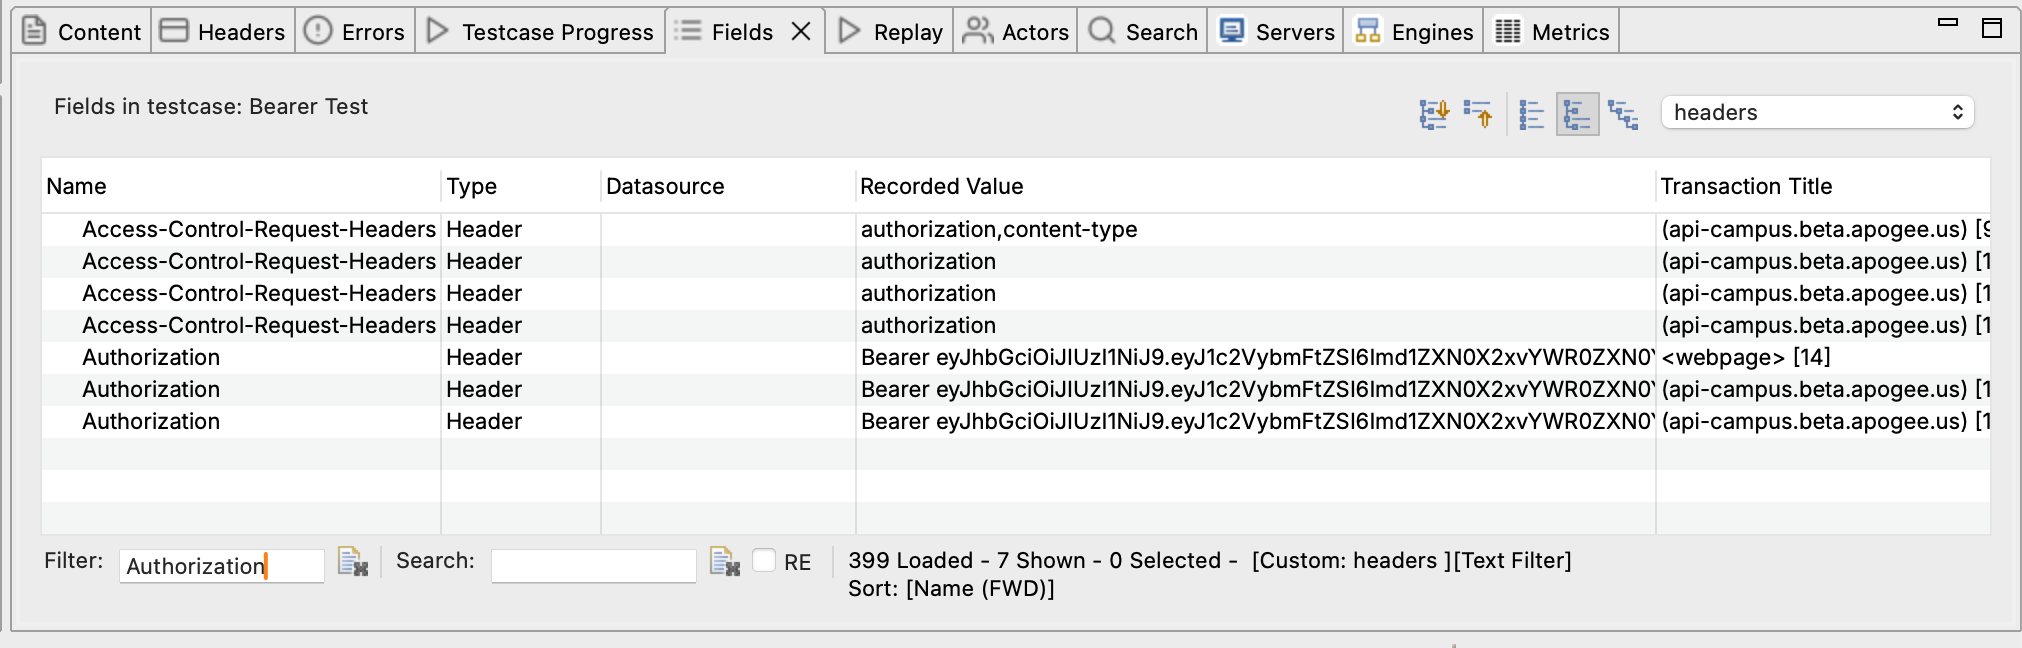
- Switch to the Fields View (View → Fields or the Fields tab)
- Set the view type to "Headers" (pulldown on the right side)
- Select your test case name at the top level - this shows ALL headers for ALL transactions
- Search for "Authorization" in the filter box (bottom left)
This produces a lot of rows, but fortunately you don't have to edit each one separately.
- Select all the Authorization header rows (click first, Shift+click last, or Ctrl+A)
- Right-click and select "Edit"
- Configure the datasource:
- Datasource type: Concatenation (because we need to add "Bearer " before the token)
- Click the green plus sign → Select "Text Constant" → Enter
Bearer(note the space after "Bearer") - Click the green plus sign again → Select "User Variable" → Enter your variable name (e.g.,
access_token)
The Space is Critical
When entering "Bearer " as the text constant, the space after the last 'r' is very important. The Authorization header format requires a space between "Bearer" and the token value. Without it, authentication will fail.
- Click OK - all of the Authorization headers are now dynamically configured
You can verify this worked by looking at the Fields View - all the configured headers should now show a datasource of "Concatenation" with your variable reference.
Multiple Token Types
Authentication keeps getting more complicated. Applications increasingly send the same token multiple ways or use multiple different tokens. Here's how to handle the common scenarios:
Same Token in Different Headers
Some applications send the access token in both:
- Authorization header:
Authorization: Bearer abc123xyz - Custom headers:
X-Auth-Token: abc123xyz,X-Session-Token: abc123xyz
Solution: Extract the token once, then configure each header type separately:
- Create ONE extractor to capture the token
- Use the same user variable in multiple header configurations
- For Authorization header: use concatenation to add "Bearer "
- For custom headers: use the user variable directly (no "Bearer " prefix)
Multiple Different Tokens
Some OAuth implementations use multiple tokens:
- Access token - Short-lived token for API access
- Refresh token - Long-lived token to obtain new access tokens
- ID token - Contains user identity information (OIDC)
Solution: Extract each token into a separate user variable:
- Create an extractor for
access_token→ store in variableaccess_token - Create an extractor for
refresh_token→ store in variablerefresh_token - Create an extractor for
id_token→ store in variableid_token - Configure each header field to use the appropriate variable
If your application issues new tokens at different points in the flow, you'll need extractors at each location. This is uncommon.
Ask the AI
If your application uses multiple tokens and you're not sure which ones matter:
Verifying Your Configuration
Whether you used ASM automatic detection or manual configuration, run a replay to verify everything works:
- Click Play in the toolbar
- Watch the Replay View - all transactions should be green (success)
- Check the Errors View - should show 0 errors
- If replay fails:
- Check the Headers View to see if the Authorization header is being sent with the correct format
- Verify the extractor is capturing the token (check the user variable value in the Replay View)
- Confirm the token variable name matches in both the extractor and the field configuration
Success Criteria
Your OAuth configuration is correct when:
- ✅ Replay completes with all green transactions
- ✅ No 401 Unauthorized or 403 Forbidden errors
- ✅ The Authorization header appears correctly in subsequent requests
- ✅ Multiple replays succeed (each virtual user gets its own token)
Common OAuth Patterns
ASM's OAuth detection rules handle these common patterns automatically:
Pattern 1: JSON Web Tokens (JWT)
Most modern OAuth implementations use JWTs. These are long encoded strings with three parts separated by dots:
eyJhbGciOiJIUzI1NiIsInR5cCI6IkpXVCJ9.eyJzdWIiOiIxMjM0NTY3ODkwIiwibmFtZSI6IkpvaG4gRG9lIiwiaWF0IjoxNTE2MjM5MDIyfQ.SflKxwRJSMeKKF2QT4fwpMeJf36POk6yJV_adQssw5c
ASM Handling: The oauth2-jwt-token detection rule validates JWT structure (three base64-encoded parts) and extracts the complete token automatically.
Manual Configuration (if needed): Extract the entire JWT string (don't try to parse the individual parts - the server needs the complete token).
Pattern 2: Short-Lived Tokens with Refresh
Some applications issue tokens that expire quickly (5-15 minutes). During a long load test, you may need to refresh the token.
ASM Handling: Multiple detection rules work together for automatic refresh:
oauth2-access-token- Captures short-lived access tokensoauth2-refresh-token- Captures long-lived refresh tokensoauth2-token-expires- Tracks expiration time (expires_in)oauth2-grant-type-refresh- Detects refresh requestsoauth2-rotating-refresh-token- Handles new refresh tokens during refresh
ASM automatically configures the refresh flow without manual intervention.
Manual Configuration (if needed):
- Record a scenario that includes token refresh (login → wait → continue using app)
- Extract both the access token and refresh token during login
- Configure the refresh transaction to use the refresh token
- Extract the NEW access token from the refresh response
- All subsequent transactions use the refreshed access token
Pattern 3: Token in URL Query Parameters
Less common but still seen: OAuth tokens passed as URL query parameters instead of headers.
Example: https://api.example.com/data?access_token=abc123xyz
ASM Handling: ASM detects tokens in URL parameters and creates assignments automatically.
Manual Configuration (if needed):
- Extract the token as usual
- Instead of configuring headers, configure the query parameter field
- Use the Fields View filtered to "Query" to find all
access_tokenparameters - Multi-select and configure them to use your user variable
Ask the AI
If you're not sure which OAuth pattern your application uses:
Troubleshooting OAuth Configuration
Problem: ASM Didn't Detect OAuth Tokens
Symptoms: After running ASM, Authorization headers still show "Recorded Value" instead of "Server authentication header".
Likely causes:
- OAuth implementation uses non-standard field names
- Tokens are in an unusual format (not standard JSON)
- Response content-type doesn't match detection rule patterns
- OAuth detection rules are disabled
Solution steps:
- Ask the AI to enable OAuth detection rules:
- Check if tokens appear in unusual field names (use Search to find token-like values)
- Verify response content-type is
application/jsonor similar - If tokens still not detected, proceed to manual configuration
AI Can Help Debug
Problem: Replay Fails with 401 Unauthorized (After ASM)
Likely causes:
- Token not being extracted (check the extractor configuration)
- Token not being injected (check the field datasource configuration)
- Wrong token being used (e.g., using refresh token instead of access token)
- Extractor pattern doesn't match the response format
Solution steps:
- Run replay and check the Replay View
- Look at the user variable values - is your token variable populated?
- Check the Headers View - is the Authorization header being sent?
- Compare the recorded Authorization header value to the replayed value - are they different?
Ask the AI
Problem: Extractor Doesn't Capture the Token
Symptoms: The Parsed Data field in the extractor dialog is empty, or the user variable shows <not set> during replay.
Likely causes:
- Regular expression pattern doesn't match the response format
- Searching the wrong transaction (token appears elsewhere)
- JSON path is incorrect
- Response content is compressed/encoded
Solution steps:
- Verify you're looking at the right transaction where the token is returned
- Copy the exact response content containing the token
- Test your regex pattern using a regex tester (regex101.com)
- Ensure your pattern uses capturing groups
()around the token value - Try a simpler pattern first, then refine
Problem: Token Changes During Load Test
Symptoms: Load test starts working, then fails with 401 errors after several minutes.
Likely causes:
- Tokens are short-lived and expiring during the test
- Application requires token refresh logic
- Session timeout is shorter than your load test duration
Solution steps:
- Check token expiration time (JWT tokens often include an
expclaim you can decode) - Record a longer scenario that includes token refresh
- Configure the refresh transaction to use the refresh token
- Extract the new access token after refresh
- Consider shorter load test duration or more frequent refresh cycles
Ask the AI
Problem: Multiple Authorization Headers Conflict
Symptoms: Some transactions succeed, others fail with 401, even though all headers are configured.
Likely causes:
- Application uses different authentication methods for different endpoints
- Some headers need Bearer prefix, others don't
- Multiple token types being mixed up
Solution steps:
- Filter the Fields View to show only Authorization headers
- Group headers by URL pattern or page
- Check which headers need "Bearer " prefix vs direct token
- Configure each group separately with appropriate concatenation or direct variable reference
Next Steps
- Test with multiple users - Run a replay to verify OAuth configuration works
- Configure datasets - Test with different user credentials
- Understand authentication patterns - Learn about other auth methods
- Handle SSO - Configure SAML and OIDC workflows
Related Topics: