Cloud Load Testing
Cloud engines let you generate load from anywhere in the world without maintaining your own hardware. Instead of buying and configuring dozens of physical servers (which sit idle 99% of the time), you spin up cloud instances on-demand on a supported provider (Amazon AWS or Microsoft Azure) for a few dollars per hour. When the test finishes, you shut them down. No maintenance, no idle hardware costs.
Why use cloud engines: You can test from multiple geographic regions simultaneously (Virginia, California, Ireland, Singapore). You can scale instantly: need 50 engines for a major product launch, spin them up in 5 minutes. The cost is $0.50-2.00 per engine per hour, which beats leasing hardware by any measure. And your test traffic comes from thousands of real IPs instead of one office network.
This guide shows you how to:
- Configure an AWS or Azure account for Load Tester
- Launch cloud engines across multiple regions
- Run load tests from the cloud
- Optimize costs (avoid surprise cloud bills)
- Troubleshoot cloud-specific issues
Prerequisites
Before using cloud engines, you need:
- A cloud provider account - An Amazon AWS account (aws.amazon.com) or a Microsoft Azure account (azure.microsoft.com)
- Provider credentials - For AWS, an Access Key ID and Secret Access Key (IAM user recommended). For Azure, a service principal (tenant ID, client ID, client secret, subscription ID)
- A Pro license - Cloud engines require a Pro license, for both AWS and Azure
- Test case configured - Should replay successfully using local engine first
- Understanding of cloud billing - Cloud engines accrue charges until terminated
Don't skip local testing. Always verify your test case replays successfully using Load Tester's built-in engine before launching cloud engines. If your test case fails locally due to configuration issues, it will fail in the cloud too. The only difference is that you'll be paying by the hour while you troubleshoot.
How Cloud Engines Work
Load Tester manages cloud engines automatically. You configure your AWS or Azure credentials once in preferences. When configuring a load test, you request engines ("10 in US-East, 5 in EU-West"). Load Tester launches cloud instances in the specified regions, the engines connect back to your workstation (which acts as controller), the load test runs with engines generating HTTP traffic to your servers, and Load Tester shuts down the engines when the test completes (or you terminate them manually).
Network architecture:
graph TD
    LT["Your Workstation<br/>Load Tester Controller"]
    subgraph aws["Cloud Engines: AWS or Azure (multiple regions)"]
        E1["Engine"]
        E2["Engine"]
        E3["Engine"]
    end
    WS["Your Web Servers<br/>Test Target"]

    LT -->|Test configuration<br/>ports 1099/1100| E1
    LT -->|Test configuration<br/>ports 1099/1100| E2
    LT -->|Test configuration<br/>ports 1099/1100| E3
    E1 -->|HTTP traffic| WS
    E2 -->|HTTP traffic| WS
    E3 -->|HTTP traffic| WS

    classDef controller fill:#fff,stroke:#333,stroke-width:1.5px,color:#333
    classDef engine fill:#f5f5f5,stroke:#666,stroke-width:1.5px,color:#333
    classDef server fill:#fff,stroke:#c0392b,stroke-width:1.5px,color:#333
    class LT controller
    class E1,E2,E3 engine
    class WS server
Key point: Your workstation must be able to reach cloud engines on ports 1099 and 1100 (RMI communication). If your corporate firewall blocks outbound connections to those ports, you'll need firewall rules or Elastic IPs (see Elastic IPs for Firewall Traversal).
One-Button Cloud Setup
The reason this page is short on operational steps is that there aren't many. The hard parts of distributed cloud load testing are solved problems from the operator's perspective. Click Run Load Test with cloud engines configured, and Load Tester handles:
- Provisioning the cloud instances in the regions you specified (EC2 instances on AWS, virtual machines on Azure)
- Installing the load generator software on each instance (the engine image is preconfigured, you don't install anything on it by hand)
- Uploading every test case to every engine, including mixed-workload tests that run multiple test cases simultaneously
- Distributing the datasets so each engine has its slice of usernames, passwords, search terms, and other per-user data
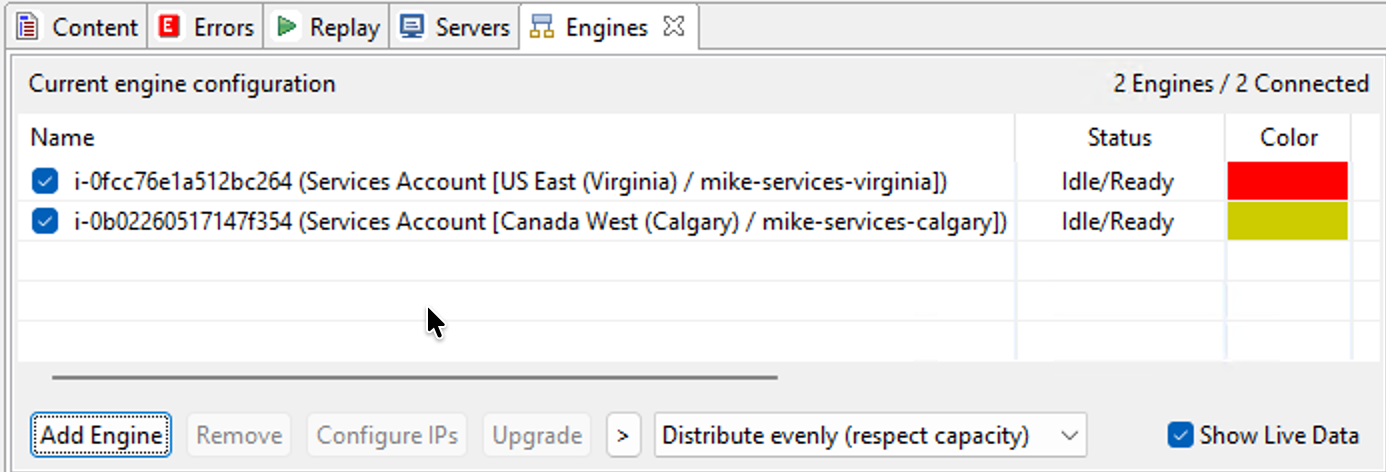
- Load-balancing virtual users across engines based on each engine's measured Capacity (the default policy is Distribute evenly (respect capacity), visible in the Engines View toolbar). Engines with more headroom get more users, engines with less get fewer, and no single generator gets pushed to where its own resource consumption distorts measurements. See the live Engines View for the per-engine Capacity numbers in action.
- Terminating the instances when the test finishes (or after an idle timeout, configurable), so you only pay for the minutes you actually ran
Load balancing across generators: solved. Software distribution: solved. Dataset distribution: solved. Multi-test-case orchestration: transparent. The complicated parts of running a hundred-load-generator distributed test happen below the surface. You don't manage them, you don't see them, you don't have to be right about them.
What's left for you to do is configure your cloud credentials once, decide how many engines you want and where, and click run. The remaining sections of this page walk through those three steps.
Step 1: Configure Cloud Credentials
You configure your cloud credentials once, then launch engines whenever you need them. Open the cloud accounts preferences page by clicking Configure Cloud Accounts in the Configure Load Engines dialog, or from Window → Preferences → Web Performance. The same page holds both Amazon AWS and Microsoft Azure accounts. Click Add... and Load Tester asks which provider hosts the account (Amazon EC2 or Microsoft Azure), then opens the matching dialog.

Pick your provider:
Load Tester uses AWS SDK v2.0 to manage EC2 instances.
Create an IAM user for Load Tester. Use a dedicated IAM user instead of root credentials:
- Log into AWS Console → IAM → Users → Create User
- Username:
LoadTesterEngines(or any meaningful name) - Access type: Programmatic access (generates Access Key ID + Secret)
- Permissions: Attach AmazonEC2FullAccess policy (or create a custom policy limiting to
ec2:DescribeInstances,ec2:RunInstances,ec2:TerminateInstances) - Save credentials: Download the CSV with the Access Key ID and Secret Access Key
A dedicated IAM user means a compromised key is revoked without touching your root account, and you can restrict it to EC2 only. Principle of least privilege.
Add the AWS account to Load Tester. In the cloud accounts preferences page, click Add..., choose Amazon EC2, and the Amazon EC2 Account dialog opens:
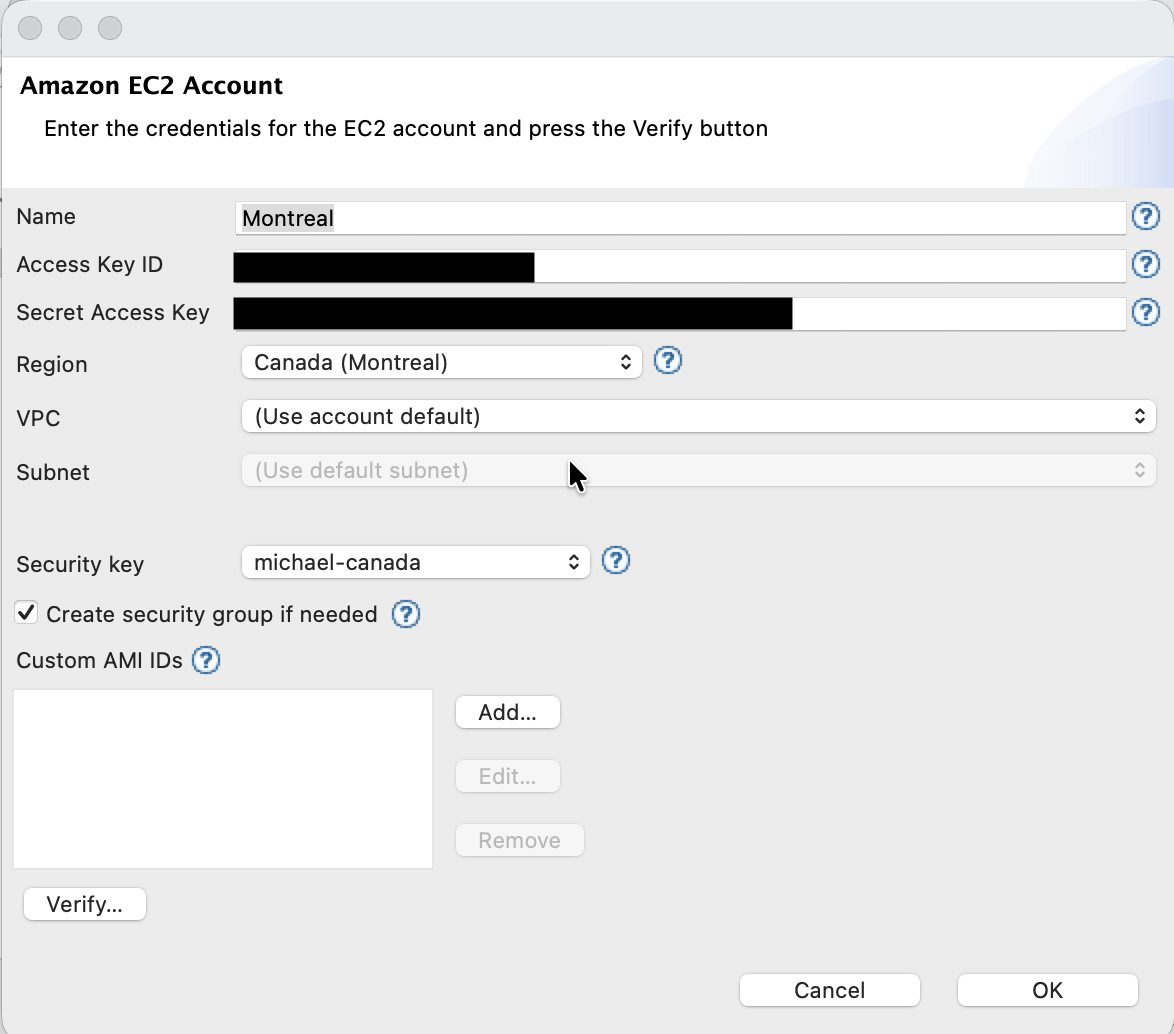
| Field | Value | Notes |
|---|---|---|
| Name | US-East (or any descriptive name) |
Helps you identify which region this account targets |
| Access Key ID | From IAM user CSV | 20-character alphanumeric string (e.g., AKIAIOSFODNN7EXAMPLE) |
| Secret Access Key | From IAM user CSV | 40-character string (keep secret) |
| Region | us-east-1 (or desired region) |
See Available Regions |
| VPC | (Use account default) |
Leave on default unless you need engines launched in a specific VPC for network reachability |
| Subnet | (Use default subnet) |
Auto-selects based on the VPC choice; override only when you need a specific subnet |
| Security key | A unique key (e.g., your name) | Used to isolate engines when multiple testers share the same AWS account. See Sharing AWS Accounts Among Multiple Testers. |
| Create security group if needed | Checked (default) | Load Tester creates an EC2 security group permitting RMI traffic between controller and engines. Uncheck only if your security policy forbids automatic SG creation, in which case you'll create one manually. |
| Custom AMI IDs | (empty) | Advanced: pin engines to a specific AMI per region. Leave blank to use the default Load Tester engine AMI. |
Click Verify... to confirm Load Tester can authenticate with AWS using the supplied credentials. Verification hits the EC2 API in the selected region. Fix any errors, then click OK. Load Tester can now launch engines in the specified AWS region.
Load Tester uses the Azure Resource Manager SDK and a service principal (an app registration plus a client secret) to manage load-generation virtual machines.
Create a service principal for Load Tester. In the Azure portal:
- Register an application: Microsoft Entra ID → App registrations → New registration. Name it
LoadTesterEngines(or anything meaningful) and register it. - Note the IDs: from the app's Overview page, copy the Directory (tenant) ID and the Application (client) ID.
- Create a client secret: Certificates & secrets → New client secret. Copy the secret value immediately, it is shown only once.
- Grant access to your subscription: Subscriptions → your subscription → Access control (IAM) → Add role assignment, and assign the Contributor role to the
LoadTesterEnginesapp. Copy the Subscription ID from the subscription Overview page. - Register the resource providers: under the same subscription, open Resource providers and confirm Microsoft.Compute and Microsoft.Network both show Registered (register them if not).
Contributor lets Load Tester create and delete the resource group, virtual network, security group, and VMs it needs for a test, then tear them all down afterward. A tighter least-privilege custom role is planned; for now, Contributor on the target subscription is the supported setup.
Add the Azure account to Load Tester. In the cloud accounts preferences page, click Add..., choose Microsoft Azure, and the Microsoft Azure Account dialog opens:
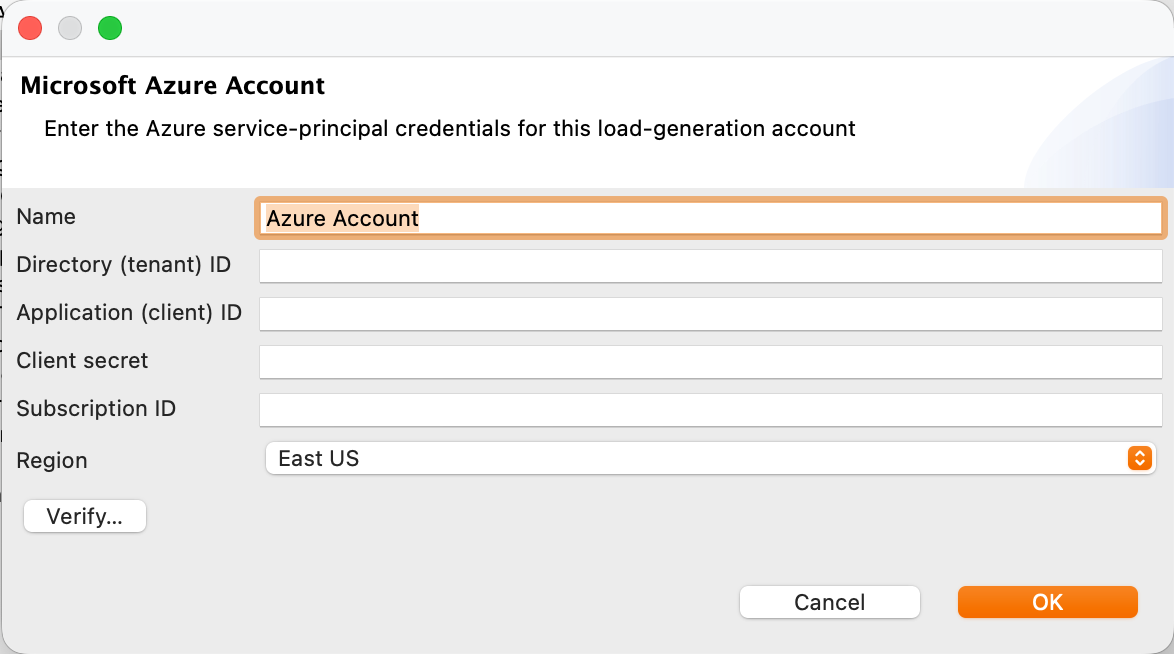
| Field | Value | Notes |
|---|---|---|
| Name | Azure East US (or any descriptive name) |
Helps you identify which subscription and region this account targets |
| Directory (tenant) ID | From the app registration Overview | Your Microsoft Entra tenant GUID |
| Application (client) ID | From the app registration Overview | The service principal's GUID |
| Client secret | The secret value you copied | Shown only once when created; regenerate a new secret if you lose it |
| Subscription ID | From the subscription Overview | The subscription the engines are billed to |
| Region | East US (or another) |
One of six: East US, East US 2, West US 2, Central US, West Europe, North Europe |
Click Verify... to confirm Load Tester can authenticate with the service principal and reach the subscription. Verification is read-only and creates nothing. Fix any errors, then click OK. Load Tester can now launch engines in the specified Azure region.
No network setup to fill in. Unlike the AWS dialog, the Azure dialog has no VPC, subnet, security group, or image fields. For each test, Load Tester automatically creates a resource group, virtual network, subnet, and network security group (opening only the ports the engines need), then removes them all when the test ends.
Step 2: Configure Multiple Regions
Real-world load comes from multiple geographic locations. Not everyone accesses your site from Virginia. Configure multiple regions to simulate traffic from North America, Europe, and Asia simultaneously. This works the same way for AWS and Azure: one account per region.
Duplicate Existing Account
Instead of re-entering credentials, duplicate the existing account and change only the region:
- In the cloud accounts preferences page, select your existing account (e.g.,
US-East) - Click Duplicate button
- Update the duplicated account:
- Account Name:
EU-West(matches new region) - Region:
eu-west-1(or desired region) - Credentials: Same as original. AWS keys and Azure service principals both work across all regions, so you reuse the same credentials and change only the region.
- Click OK
- Repeat for additional regions
Result: You now have multiple cloud accounts in Load Tester, each targeting a different region. You can mix engines from different regions, and from both AWS and Azure, in a single load test.
Available Regions
Load Tester supports AWS regions worldwide:
| Region Code | Location | Typical Use Case |
|---|---|---|
| us-east-1 | Virginia (US East) | North American users, default AWS region |
| us-east-2 | Ohio (US East) | North American users, lower latency to central US |
| us-west-1 | California (US West) | Western US users |
| us-west-2 | Oregon (US West) | Western US / Pacific Northwest users |
| eu-west-1 | Ireland (EU) | European users |
| eu-central-1 | Frankfurt (Germany) | Central European users |
| ap-southeast-1 | Singapore (Asia-Pacific) | Southeast Asian users |
| ap-southeast-2 | Sydney (Australia) | Australian / Pacific users |
| ap-northeast-1 | Tokyo (Japan) | Japanese / East Asian users |
| sa-east-1 | São Paulo (South America) | South American users |
Choosing regions: Match your user distribution. If 60% of users are in North America, 30% in Europe, 10% in Asia, use 12 US engines, 6 EU engines, 2 Asia engines. To test geographic performance, launch identical load from US-East and EU-West and compare response times (this reveals CDN effectiveness and geographic routing issues). For regulatory compliance, test with EU engines to verify that European users are being served from EU datacenters.
Azure Regions
Azure load generation offers six regions. Pick them in the Region dropdown when you add or duplicate an Azure account:
| Region | Location | Typical Use Case |
|---|---|---|
| East US | Virginia (US East) | North American users |
| East US 2 | Virginia (US East) | North American users, extra capacity in the same area |
| West US 2 | Washington (US West) | Western US users |
| Central US | Iowa (US Central) | Central US users |
| West Europe | Netherlands | Western European users |
| North Europe | Ireland | Northern European users |
Match these to your user geography the same way you would for AWS. To compare providers head to head, run the same test from East US on Azure and us-east-1 on AWS.
Step 3: Launch Cloud Engines
With cloud accounts configured, you can now launch engines for a load test.
Configure Load Test with Cloud Engines
- Open a test case in Navigator
- File → New → Load Configuration (or open an existing load configuration)
- In the Load Configuration Editor, find the Infrastructure panel and open Configure Load Engines
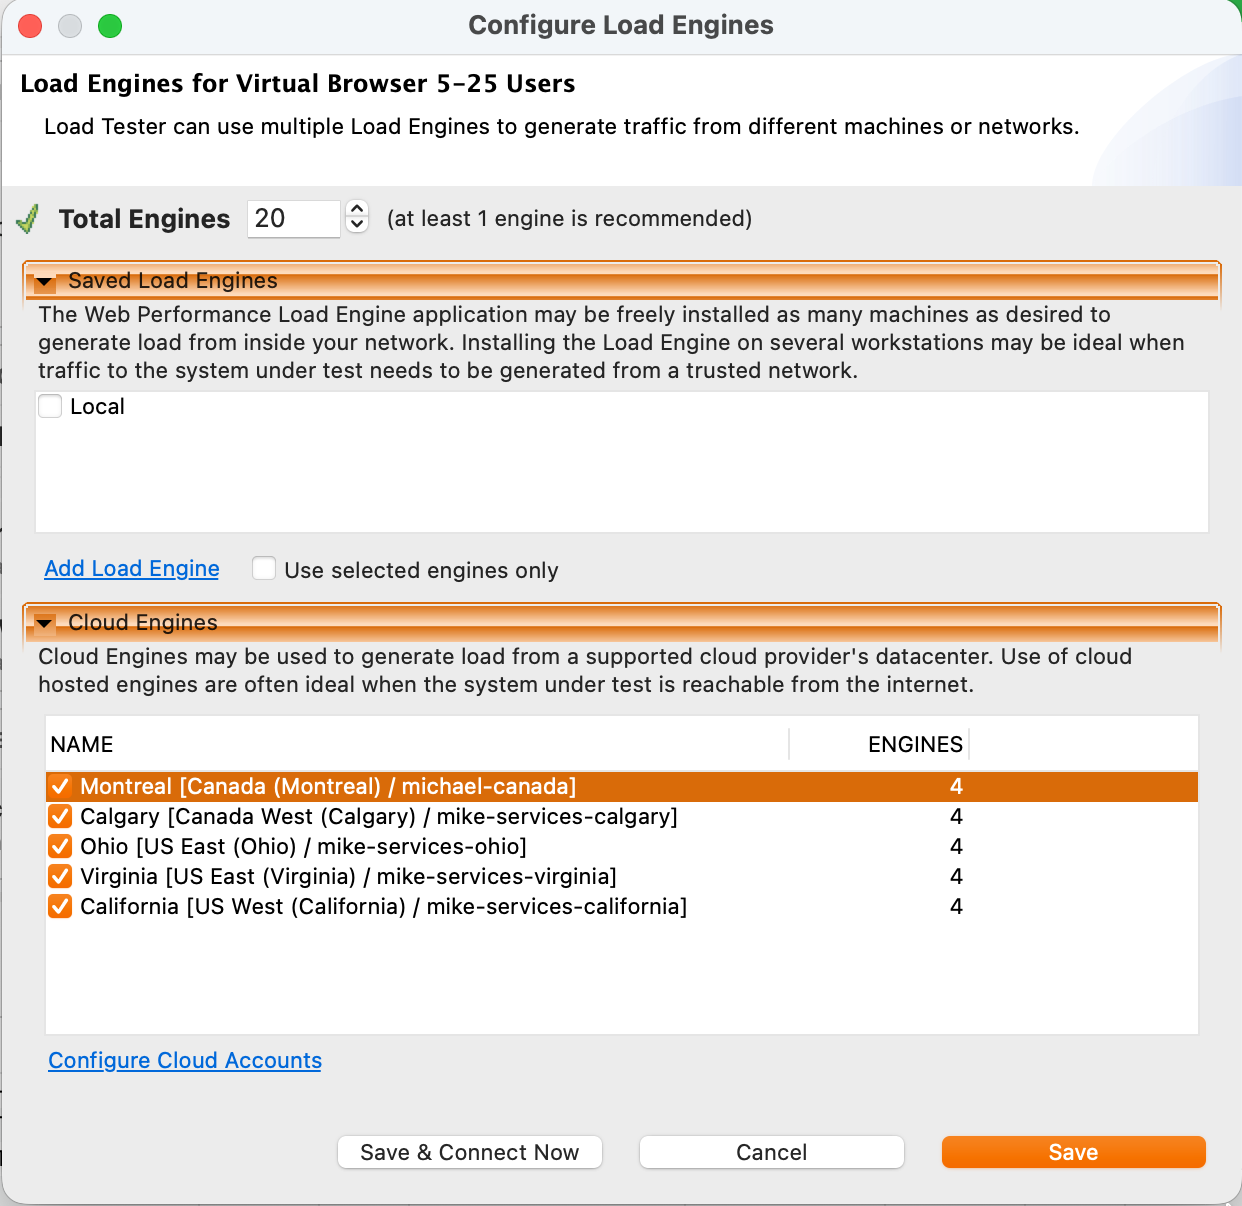
- The Configure Load Engines dialog opens. It has two sections:
- Saved Load Engines lists locally-installed Load Engines (your own machines). Check Use selected engines only if you want to restrict the test to those local engines and skip the cloud entirely.
- Cloud Engines lists every cloud account you configured in Step 1, both AWS and Azure, with an Engines column where you type the engine count per account. Each row shows the provider, region, and account so you can tell them apart (for example, an Amazon EC2 account in US East and an Azure Account in East US).
- Set per-account engine counts in the Cloud Engines table. Set each row to the number of engines you want from that account's region. Setting a row to
0excludes that account. The Total Engines badge at the top updates live as you type. - Click Save
Engine distribution:
- Total engines: Sum of every account's engine count (in the screenshot, 2 accounts × 2 engines = 4 total)
- Virtual users per engine: Load Tester automatically distributes the test's total virtual users across the engines (for example, 600 VUs / 4 engines = 150 VUs per engine, balanced so no single engine is pushed to the point where its own resource consumption distorts measurements)
Instance startup time: roughly 3-5 minutes per engine (the provider boots the OS, Load Tester engine software starts, engine connects back to your workstation). Use Save & Connect Now if you want Load Tester to provision the engines immediately so they're ready when you click Start Load Test. Plain Save defers provisioning until test start.
Start the Load Test
- Click Run (▶️) in Load Test Configuration
- Confirm engine launch popup appears: "Launch 15 cloud engines?"
- Click Yes
What happens:
- Load Tester calls the provider's launch API for each account (EC2 RunInstances on AWS, VM create on Azure)
- The provider starts the instances (a compute-optimized instance type on AWS, an x86_64 VM size on Azure)
- Engines boot (takes 3-5 minutes)
- Engines connect to Load Tester (appear in Engines View as "Connected")
- Load test configuration is sent to engines (test case, VU assignment, load profile)
- Load test starts when all engines are ready
Monitoring engine startup:
- Open Engines View: Window → Show View → Engines
- Watch for engines to appear as they connect (shows hostname, region, status)
- If engine shows "Starting" for 10+ minutes: Likely network issue (firewall blocking ports 1099/1100)
Understanding Cloud Engine Performance
Cloud engines are virtual machines that share physical hardware with other AWS customers. This affects performance and requires different capacity planning than dedicated hardware.
Virtual Users Per Engine
How many VUs can one engine simulate? For typical test cases, 500-1,000 VUs per engine (simple HTTP traffic, minimal SSL). For SSL-heavy workloads, 200-500 VUs per engine because SSL handshakes are CPU-intensive. Load Tester enforces a hard maximum of 3,000 VUs per engine to prevent overload.
Why the range is so wide: downloading large files (videos, PDFs) exhausts bandwidth before CPU. High request rates exhaust CPU before bandwidth. Extractors, validators, and datasets add CPU overhead. And then there's the noisy-neighbor problem, where other AWS customers on the same physical hardware consume resources you were counting on.
Best practice: Use more engines than the minimum required. If you need 5,000 VUs and 1,000 VUs/engine is typical, use 7-8 engines instead of 5. The extra engines provide buffer for variability and improve test realism by generating traffic from more diverse IP addresses.
Bandwidth Expectations
Each cloud engine has a 100 Mbps network connection, but due to virtualization overhead and shared infrastructure, you should plan for:
- Conservative estimate: 70 Mbps per engine (use this for capacity planning)
- Peak observed: 100+ Mbps per engine (under ideal conditions)
- Reality: Variability is normal; some engines may get 60 Mbps, others 90 Mbps
Bandwidth varies because multiple virtual machines share the same physical NIC, other customers' workloads affect available resources, and geographic routing means that US-East to US-West traffic may traverse different network paths with different congestion levels.
Validating bandwidth:
- Open Engines View during load test
- Check "Bandwidth" column for each engine
- If any engine shows bandwidth at/near 100 Mbps: Test results may be invalid (bottleneck is engine bandwidth, not server capacity)
- If bandwidth is consistently maxed out: Add more engines to distribute load
Bandwidth Test Wizard: Tools → Bandwidth Test Wizard runs a pre-configured bandwidth test to verify engine capacity before running your actual load test.
Self-Regulating Engines
Load Tester engines monitor their own resource usage and automatically reduce load if they detect overload conditions:
- CPU utilization > 90%: Engine stops accepting new VUs
- Memory exhaustion: Engine warns and stops accepting new VUs
- Bandwidth saturation: Engine reports bandwidth limit (visible in Engines View)
This prevents invalid test results. If an engine is overloaded, response times artificially increase, and you end up measuring the engine's limitations instead of the server's.
If engines self-regulate during your test:
- ✅ Good: Engines prevented invalid data collection
- ❌ Problem: You need more engines to achieve target VU count
- 🔧 Solution: Add engines and re-run test
Optimizing Cloud Costs
Cloud engines cost $0.50-2.00 per engine per hour depending on instance type and region. If you're not careful, you can rack up hundreds of dollars in unexpected charges. This section exists because people have learned that lesson the hard way.
Amazon Billing Rules
Amazon charges for cloud instances by the hour. Partial hours round up, so a 1-minute test gets billed for a full hour. The clock starts when the instance state changes to "running" (OS booting) and stops only when the instance is terminated, not stopped. Stopping still accrues charges.
Example:
- Test 1: 10-minute test, terminate engines immediately → billed for 10 engine-hours (1 hour × 10 engines)
- Test 2: 65-minute test, terminate engines immediately → billed for 20 engine-hours (2 hours × 10 engines, because 65 minutes rounds up to 2 hours)
- Test 3: Run 3 tests back-to-back (10 min, 15 min, 10 min), keep engines running between tests, terminate after last test → billed for 10 engine-hours (1 hour × 10 engines) instead of 30 engine-hours (3 hours × 10 engines)
The takeaway: If you're running multiple tests in one session, keep engines running between tests instead of terminating and restarting. You're paying for the hour either way.
Azure Billing Rules
Azure bills its virtual machines per second, so you are not penalized by hour-rounding the way AWS is. A 10-minute Azure test costs roughly ten minutes of VM time, not a full hour. The discipline is still the same, though: a forgotten VM bills around the clock, so terminate engines when you finish. Load Tester's automatic idle shutdown applies to Azure exactly as it does to AWS (see Automatic Idle Shutdown), and when it reaps an idle Azure account it deletes the whole resource group it created, so nothing is left running.
When to Keep Engines Running
If you plan to run multiple tests within an hour, keep engines running:
- ✅ Example: Running 5 tests over 2 hours → keep engines running entire time → billed for 2 hours
- ❌ Counterexample: Starting/stopping engines for each of 5 tests → billed for 5 hours (5 × 1-hour minimum)
When to terminate engines immediately:
- Single test: No more tests planned → terminate immediately after test completes
- End of workday: No more tests for hours/days → terminate to avoid idle charges
- Uncertain schedule: Don't know when next test will run → terminate to be safe
Automatic idle shutdown (enabled by default) terminates idle engines after 30 minutes of inactivity. This prevents surprise charges if you forget, but always verify in the AWS Console that engines are actually terminated. Trust, but verify.
Terminating Cloud Engines
Load Tester provides multiple ways to terminate engines:
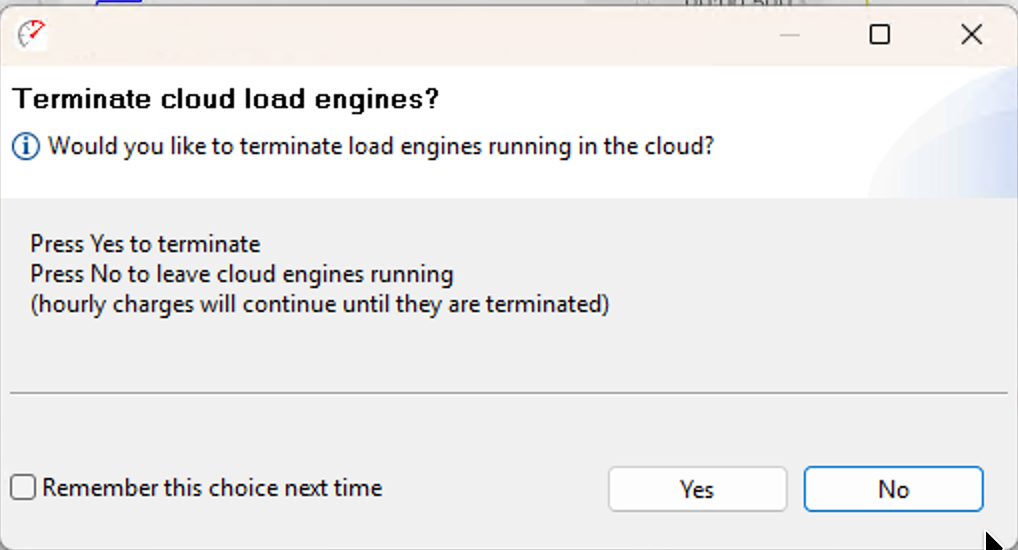
Option 1: End-of-Test Prompt
When a load test finishes, Load Tester prompts: "Terminate cloud engines?"
- Click Yes: Engines are terminated immediately (stops billing)
- Click No: Engines remain running (useful if running another test soon)
Option 2: Engines View (Manual Termination)
To terminate engines at any time:
- Open Engines View: Window → Show View → Engines
- Select engine(s) to terminate (Shift-click to select multiple)
- Click Remove (🗑️ icon)
- Confirm termination → Engines shut down and are terminated in AWS
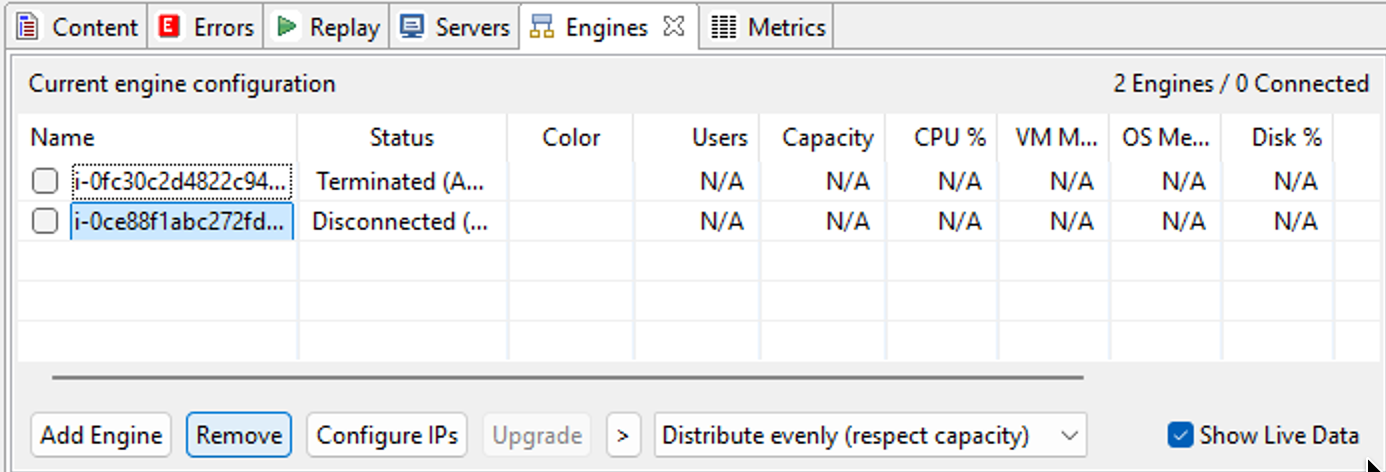
When engines are terminated:
- Status changes to "Terminating" (takes ~1 minute)
- Engine disappears from Engines View once terminated
- AWS Console shows instance as "Terminated"
Option 3: Automatic Idle Shutdown
By default, Load Tester terminates engines that idle for 30 minutes:
- To configure idle timeout: Tools → Preferences → Cloud Accounts → Idle shutdown period
- Recommended setting: 30 minutes (default)
- When engines idle: Countdown timer starts; at 0 minutes, engines are terminated automatically
When to disable idle shutdown: If you intentionally leave engines running for hours between tests (rare).
Option 4: AWS Console (Emergency Termination)
If Load Tester crashes or you lose connection to engines:
- Log into AWS Console → EC2 Dashboard
- Select region (top-right dropdown) → Check each region where you launched engines
- View running instances → Look for instances with "WebPerformanceLoadEngine" in the name
- Select instances → Actions → Instance State → Terminate
Make this a habit: Check the AWS Console at the end of every testing session. Don't rely solely on Load Tester's automatic shutdown. The $500 surprise bill only happens once before you start checking.
Testing Multiple Regions
Simulating traffic from multiple geographic regions makes load tests more realistic and can reveal geographic performance issues.
Configuring Multi-Region Tests
To run a load test using engines from 3 regions:
- In Load Configuration Editor, add engines from multiple cloud accounts:
US-East: 10 enginesEU-West: 5 enginesAP-Southeast: 3 engines- Total: 18 engines across 3 regions
- Start load test
What happens:
- Load Tester launches engines in all 3 regions simultaneously
- Virtual users are distributed across all engines (e.g., 3600 VUs / 18 engines = 200 VUs per engine)
- HTTP traffic originates from all 3 regions at the same time
- Server sees requests from Virginia, Ireland, and Singapore IPs
Analyzing Regional Performance
Different regions will experience different response times due to network latency:
| Region | Typical Latency to US Server | What This Means |
|---|---|---|
| US-East | 1-10 ms | Fast (same datacenter or nearby) |
| US-West | 50-80 ms | Moderate (cross-country) |
| EU-West | 80-150 ms | High (transatlantic) |
| AP-Southeast | 150-250 ms | Very high (halfway around the world) |
Analyzing results:
- After load test completes, open Load Test Results View
- Group results by engine (or by region if you named accounts descriptively)
- Compare average response times:
- US-East engines: 50 ms average
- EU-West engines: 180 ms average
- AP-Southeast engines: 280 ms average
What this tells you: European users experience 3.6x slower responses than US users. If you use a CDN, EU and Asia response times should be much closer to US times (the CDN serves content from local edge locations). If EU times are 10x slower than expected, you have a routing problem worth investigating.
Elastic IPs for Firewall Traversal
By default, cloud engines get random public IPs from Amazon's pool. This causes two problems. Load Tester can't connect to engines if your corporate firewall blocks outbound connections to random IPs. And cloud engines can't reach your test servers if your server firewall only allows traffic from known IPs.
Solution: Use Amazon Elastic IPs (static IPs that don't change across engine launches).
Purchasing Elastic IPs
- Log into AWS Console → EC2 → Elastic IPs
- Click "Allocate Elastic IP address"
- Select region (must match the region where you'll launch engines)
- Click "Allocate"
- Repeat for however many engines you plan to run (one Elastic IP per engine)
Cost: ~$0.005 per hour per Elastic IP when associated with a running instance (free when instance is running, small charge when instance is stopped)
Assigning Elastic IPs to Engines
After launching cloud engines:
- In AWS Console, go to EC2 → Instances
- Identify Load Tester engine instances (named "WebPerformanceLoadEngine...")
- Select an instance → Actions → Networking → Associate Elastic IP
- Choose an Elastic IP from the list → Associate
- Repeat for each engine
Now you must reboot engines and restart Load Tester:
- In AWS Console, select all engine instances → Actions → Instance State → Reboot (do NOT terminate!)
- Wait ~2 minutes for engines to reboot
- Close Load Tester and restart it
- Engines reconnect using the Elastic IPs
Why reboot and restart: The engine software started listening on the original IP before you assigned the Elastic IP, so it doesn't detect the change automatically. And Load Tester cached the original IP, so it needs to re-query AWS to discover the new Elastic IPs.
Configuring Firewalls for Elastic IPs
Now that engines have fixed IPs, configure your firewalls:
Firewall Rule 1: Allow your workstation to connect to cloud engines
- Source: Your workstation IP
- Destination: Elastic IP(s) of cloud engines
- Ports: TCP 1099, 1100 (RMI communication)
- Direction: Outbound
Firewall Rule 2: Allow cloud engines to reach test servers
- Source: Elastic IP(s) of cloud engines
- Destination: Your test server IPs
- Ports: TCP 80, 443 (HTTP/HTTPS), or whatever ports your application uses
- Direction: Inbound (if server firewall is restrictive)
Contact your network administrator to implement these rules.
Troubleshooting Cloud Engines
Problem: Load Tester Can't Connect to Engines
Symptom: Engines show "Starting" in Engines View for 10+ minutes, or "Unable to connect" error appears
Causes:
- Firewall blocks ports 1099/1100: Your corporate firewall blocks outbound connections
- Incorrect AWS credentials: Load Tester can't launch instances
- AWS region mismatch: Engines launched in different region than expected
- Network routing issue: Load Tester can't reach AWS public IPs
Diagnostic steps:
- Check AWS Console: Are instances actually running? (EC2 → Instances in correct region)
- If instances aren't running: Check Load Tester's error log (likely AWS credential issue)
- If instances are running: Network/firewall issue
Fixes:
- Firewall issue: Configure firewall rules for ports 1099/1100, or use Elastic IPs (see Elastic IPs for Firewall Traversal)
- AWS credentials wrong: Tools → Preferences → Cloud Accounts → Verify Access Key ID and Secret match IAM user
- Wrong region: Check cloud account region setting matches AWS Console region
Problem: Test Fails with "Unable to establish connection to the server"
Symptom: Load test runs, but transactions fail with "Unable to establish connection to the server: testserver:1080"
Cause: Cloud engines can't resolve internal hostnames because they're outside your network.
Example:
- Recording used hostname:
testserverortestserver.local(internal DNS) - Cloud engines can't resolve: They have no access to your internal DNS
Solutions:
Solution 1: Use Public Hostname
If your test server is publicly accessible:
- Re-record test case using the public hostname (e.g.,
www.example.cominstead oftestserver) - Or: Use mass-edit to replace hostnames (Edit → Find/Replace in Test Case Editor)
- Run replay locally to verify (using local engine)
- Then run cloud test
Solution 2: Test Non-Public Sites with VPN
If your test server is internal-only:
- Option A: Use on-premise engines instead of cloud engines (install Load Tester engine software on servers inside your network)
- Option B: Set up VPN connection from AWS to your network (requires coordination with network admin)
- Option C: Use AWS Direct Connect (dedicated network link between AWS and your datacenter)
Realistically, most organizations use cloud engines for testing public-facing applications. If your app isn't publicly accessible, on-premise engines are almost always simpler than setting up VPN or Direct Connect.
Problem: Bandwidth Bottleneck
Symptom: Load test runs, but Engines View shows engines at/near 100 Mbps bandwidth consistently
Cause: Engine bandwidth is the bottleneck, not server capacity. Test results are invalid.
Fix:
- Add more engines to distribute bandwidth load (e.g., increase from 5 engines to 10)
- Reduce bandwidth-heavy operations in test case (if downloading large files, consider removing them for load testing)
- Run Bandwidth Test Wizard first to verify each engine's capacity (Tools → Bandwidth Test Wizard)
Preventing this:
- Plan engine count based on bandwidth: If test case downloads 50 MB per user, and each engine has 70 Mbps capacity → ~11 users per engine max (50 MB × 8 bits/byte = 400 Mbits, 400/70 = ~6 seconds per user, or ~10 users/min per engine)
Problem: Surprise AWS Bill
Symptom: Amazon charged $500 for 200+ hours of instance time, but you only ran a few tests
Cause: Engines weren't terminated after tests finished. They ran for days/weeks idle.
Diagnosis:
- Check AWS Console billing → See which instances ran and for how long
- Check AWS Console instances → See if engines are still running right now
- Terminate any running engines immediately (Actions → Instance State → Terminate)
Prevention: Always check the AWS Console at the end of each testing session. Enable automatic idle shutdown (30-minute timeout). Set up AWS billing alerts so you get notified when charges exceed a threshold. And don't leave Load Tester running unattended overnight with cloud engines active.
Refund policy: Amazon does not provide refunds for forgotten instances. You agreed to their terms when creating the account. No exceptions, regardless of how politely or indignantly you ask.
Advanced Topics
Running Load Tester in the Cloud
You can install Load Tester itself on an AWS Windows instance (not just the engines). This is useful if:
- Your workstation has unreliable internet: Load test continues even if your connection drops
- Your workstation shares bandwidth with test servers: Installing Load Tester in AWS avoids network contention
- You need 24/7 load testing: AWS instance runs continuously
Setup:
- Launch Windows instance in AWS (t3.large or larger recommended)
- Install Load Tester on the Windows instance
- Configure AWS credentials for launching engines (same as local installation)
- Connect via RDP to run tests remotely
Don't record test cases on cloud Windows instances. The default IE security settings are overly restrictive and don't represent normal user behavior. Always record locally, then upload the WPT files to the cloud Load Tester instance.
Custom Instance Types
By default, Load Tester uses Medium High-CPU instances (optimized for compute-intensive workloads like load generation).
To use different instance types (larger/smaller):
- Not currently configurable in UI: Contact support if you need custom instance types
- Why Medium High-CPU: Balances CPU performance, network throughput, and cost
On Azure, engines run on an x86_64 VM size (the D, E, and F series) booted from a Canonical Ubuntu 24.04 LTS image. As with the AWS instance type, the Azure VM size and image are fixed rather than configurable in the UI. Contact support if you need something different.
Sharing AWS Accounts Among Multiple Testers
If multiple people share the same AWS account for cloud engines, you can isolate engines using security keys:
- Create unique SSH key pair per tester in AWS Console (EC2 → Key Pairs)
- Each tester configures their cloud account in Load Tester with their unique key name
- Load Tester only shows engines launched with that tester's key
This prevents the unfortunate scenario where Tester A accidentally terminates Tester B's engines mid-test.
Ask the AI to Optimize Cloud Tests
If you're struggling with cloud engine configuration or costs:
I need to run a load test with 10,000 virtual users across US and EU regions.
Can you help me calculate how many engines I need and estimate the cost?
The AI can:
- Calculate engine requirements based on VU count and test case characteristics
- Recommend regional distribution based on user geography
- Estimate AWS costs (instance hours, Elastic IPs if needed)
- Optimize engine count to minimize costs while avoiding bottlenecks
- Troubleshoot "Unable to connect" errors by analyzing firewall/network configuration
- Recommend bandwidth testing procedures before running expensive large-scale tests
Next Steps
After running cloud load tests:
- Analyze results: See Analyzing Results
- Monitor servers during test: See Server Monitoring
- Troubleshoot failures: See Load Testing Issues
For load testing configuration:
- Configure load profiles: Configuring a Load Test
- Run load tests: Running a Load Test
- Monitor during test: Monitoring During a Load Test
For cost optimization:
- AWS billing best practices: Set up billing alerts in AWS Console
- Terminate engines checklist: Always verify in AWS Console at end of day